Showing posts with label recipe. Show all posts

Tuesday, March 29, 2011

Green Beans steamed in a 700-watt microwave oven

Place a microwave-safe package of green beans in a dish, cut off one corner, and microwave for the amount of time suggested in the directions.  This is a one-pound bag and the directions specify 3 minutes.


A pound of "French Beans" microwaved in the bag
Because this oven is only 700 watts, I gave them 3 minutes, tried one when they had cooled for a few minutes, then gave them another three minutes.  They were still crunchy but not raw.  I think 5 minutes with no pause might be better.

The beans should still be crunchy enough to enjoy chilled with lemon, oil, and
garlic, or served warm with butter.  A versatile food,  easily prepared!

To see a full set of photographs showing how this dish was made, go to this set on flickr.   (It will open in a new tab or window; to return to this page, just close it.) The small pictures are thumbnails; click on each one to see it full-size, and to read the comments under it.  If you prefer to use the slideshow feature, you won't see the captions unless you click on "show info" (top right).

Saturday, March 26, 2011

Fresh English Peas

We found fresh shelled English peas at Sam's Club, two 12-ounce packages bundled together.  We are going to steam them in a small microwave steamer, called a "Mini Steamer", in a 700 watt microwave oven.

To the mini steamer, add 1 cup of water below the basket.

Pour one 12-ounce bagful of fresh peas into the steamer basket. They fit nicely.  Cover the steamer.

Fresh English peas in a mini steamer

Directions on the package of peas call for 3 minutes, but, assuming that means a full-size oven, and because the peas are compactly held in this small steamer, I gave them 6 minutes.  That turned out to be about right.

(If you are cooking frozen peas, they are already partially cooked, but then you are starting the cooking process while they are still frozen.  The best thing to do is start with 3 minutes and then check.)

Empty cooked peas into a bowl and serve with butter or other seasoning, or chill for use in salad.

To see a full set of photographs showing how this dish was made, go to this set on flickr.   (It will open in a new tab or window; to return to this page, just close it.) The small pictures are thumbnails; click on each one to see it full-size, and to read the comments under it.  If you prefer to use the slideshow feature, you won't see the captions unless you click on "show info" (top right).

Thursday, March 24, 2011

Rice Steamed in a Hot Pot

Another successful dormitory work-around!  Rice, steamed in the lowly hot pot.

We usually simmer rice in water, but in Asia, people sometimes soak the rice first, then steam it above boiling water.  It was worth a try!

Soak one and a half cups of medium grain white rice in 2 cups of water for 4 hours or more.  Drain, rinse, and drain again.

Set a steamer basket into the hot pot over a cup of water.  We lined the basket, bottom only, loosely with foil. (I suspect large leaves, such as cabbage leaves, would give better results as the steam could rise through the rice but haven't yet tried it.)

Distribute soaked rice around the steamer basket.

Steam with lid tightly shut until rice has softened - half an hour or more, adding water to the bottom of the pot in trickles as needed.

Hot Pot with fluffed white rice
Unplug the pot, fluff the rice with a fork, and close the lid.  Let the rice sit for awhile before serving, to steam and soften some more.

To see a full set of photographs showing how this dish was made, go to this set on flickr.   (It will open in a new tab or window; to return to this page, just close it.) The small pictures are thumbnails; click on each one to see it full-size, and to read the comments under it.  If you prefer to use the slideshow feature, you won't see the captions unless you click on "show info" (top right).

Tuesday, March 15, 2011

Microwave Popcorn

1.  There are alleged health risks in eating pop-in-the-bag microwave popcorn, though now it's been identified as the butter flavoring, one would think manufacturers will have changed the formula.  There are better reasons for avoiding that product:  too much trash is produced, and it's a waste of money!  The popcorn popper shown here produces popcorn as good or better at a fraction of the cost.

Popcorn Popper in 700 Watt Microwave Oven
2. Good news is, this microwave popcorn popper fits into the 700 watt oven and works fine! Mine is labelled "Orville Redenbacher" but I think it's made by Presto.   2 Tb. oil, 1/2 cup popcorn at 3 minutes 15 seconds popped it all with no scorching.

The popper will soon pay for itself in what you are not spending on those microwave bags.  The "concentrator" - a piece of glorified cardboard that fits in the bottom of the popper - can be used many times before it must be replaced.

To see a full set of photographs showing how this dish was made, go to this set on flickr.   (It will open in a new tab or window; to return to this page, just close it.) The small pictures are thumbnails; click on each one to see it full-size, and to read the comments under it.  If you prefer to use the slideshow feature, you won't see the captions unless you click on "show info" (top right).

Friday, March 11, 2011

Vegetarian Soup Cooked in a Small Microwave Oven

Planning a diet both adequate and interesting using only appliances permitted in a dormitory room is a challenge!  Warming up chicken noodle soup gets old in a hurry.

Our goal with this soup, as with other recipes here, is to prepare a meal from scratch, using mostly fresh ingredients, in an appliance permitted by campus housing in most dorms. In this instance we want a vegetarian soup, and really, vegan stock is a challenge in any circumstance because the broth tends to seem thin and unsatifying.  We've been reading and experimenting, and we've learned that taking care to add ingredients high in glutamates ("umami") as well as those high in flavor helps greatly.


4-5 cups cut-up seasoning veggies to be microwaved
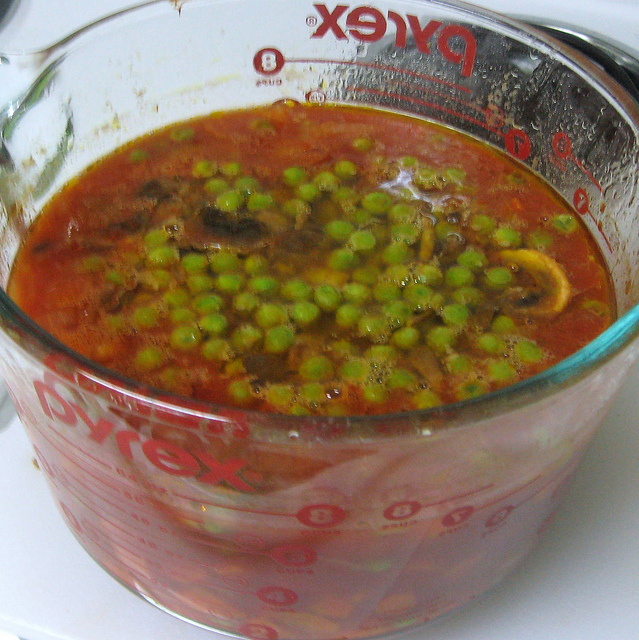
This soup was made in a Pyrex container in a 700 watt (dorm-room size) microwave. It could be done in a hot pot if the recipe is cut in half. This is just the basic soup; once it's prepared, other ingredients - beans and greens - can be added, and the soup heated for a few more minutes.

Ingredients:

1 large onion, diced
3 carrots, diced
1/2 bell pepper, diced
2 stalks celery, diced
Several fresh mushrooms, cut up
2 cloves garlic, crushed
1/4 c. vegetable oil


Put all this (loosely) into a 2-quart pyrex container with lid. It should be 4-5 cups; if much less than that, either add more veggies or reduce cooking time.  Mix to coat all ingredients with oil.  Place lid loosely on the container, to capture spatters but allowing steam to escape.

Microwave 15 minutes in a small (700 watt) oven; adjust time downward if your oven is full-size.  Pause occasionally to check and to stir.  The objective here is to wilt the vegetables, and then to lightly saute them.

Then add:

1 small can tomato paste
1 cup frozen green peas
Water to the 6-cup level


Microwave with lid on for 15 minutes.

Now remove 3 cups of the mixture (half of it) for use in another meal.  Freeze it, perhaps.
To the 3 cups remaining in the container, add some fresh ingredients:

Fresh chopped parsley
Chopped green onion
1 regular tomato or a few small ripe tomatoes, cut up


Microwave 5 more minutes.

The soup now is ready to eat!

Basic soup, ready for addition of some fresh ingredients.

To make minestrone, add a few spoonsful of beans and some chopped greens, such as cabbage, and microwave a few more minutes.

We haven't mentioned seasoning! With an herb or two you can give this basic soup the character of your favorite ethnic cuisine.

Salt and pepper to taste.
 Common soup seasonings are bay leaf, and any combination of fragrant herbs. If you want Italian flavors, basil and oregano are the usual. For a more northern experience, try dillweed, or go south with cumin.

To see a full set of photographs showing how this dish was made, go to this set on flickr.   (It will open in a new tab or window; to return to this page, just close it.) The small pictures are thumbnails; click on each one to see it full-size, and to read the comments under it.  If you prefer to use the slideshow feature, you won't see the captions unless you click on "show info" (top right).

Wednesday, March 9, 2011

Meatballs with Pasta Cooked in a Hot Pot

That little hot pot, meant for warming up canned soup,  can do so much more with some planning.  Here we've made Italian dinner for two!  Just add salad, some crusty bread with olive oil, two candles and a bottle of wine.

Meatballs and Pasta cooked in a hot pot
In a mixing bowl, mix together by hand:

2/3 pound lean ground beef
1 small can tomato paste
1 egg
[breadcrumbs, optional]
Italian seasoning blend, to taste
1 tsp salt

Other ingredients will be needed:

1 bell pepper
1 small can tomato paste
1//4 lb pasta - spirals, bowties, or similar small shape

Form meat mixture into walnut-size meatballs

Insert a steamer basket into the hot pot, and add about 1 - 1/2 cups water under it.

Cut a bell pepper into 1-inch strips, and line the bottom of the basket with half the strips. Cover the pepper strips with half of the meatballs.  Then another layer of bell pepper and the remainder of the meatballs.

Plug in the hot pot and bring it to a boil.  Because the meatballs are not down in the water but are above it, steaming, they won't cook except when the water is boiling.  Turn the dial down a bit when the water boils, then back up when it stops boiling.  Trickle water down the spout when you can hear it boiling but can't see water in the spout.  You want to keep the water level about the same as it was at the start.

Meatballs on a steamer basket in the hot pot

Half an hour or so later the meatballs will be done.   Gently lift the meatballs out of the pot with tongs. Slice the cooked peppers into small pieces and set them aside for the sauce.

Liquid from under the steamer basket is brothy and flavorful, a good base for the sauce.  Pour it into a small bowl and add to it one can of tomato paste. Salt and season to taste.

Clean the pot and the steamer basket, then fill with water to about 2 inches from the top.  Salt, and bring the water to a boil.  Pour in about 1/4 lb. of pasta.   Leave the lid ajar, or open!  Otherwise it will boil over.  Boil until the pasta is cooked but still firm "al dente", stirring occasionally.  Water must be added as it rapidly boils away!

Unplug the pot, close the lid, and pour out the hot water.  Add an ounce or two of cold water to cool the bottom of the pot and then let it stand for a few minutes to drain.  Pour out the water again and dump the pasta, steamer basket and all,  into a bowl, then lift the basket off of the pasta.

Boiling pasta in a hot pot, with steamer basket

Return sauce with cooked pepper pieces and meatballs to the pot.  Heat gently to a simmer.  Spread the cooked pasta over the meatballs and continue to heat on "low" for a few minutes. Turn off the pot and serve.

Serves two generously.

To see a full set of photographs showing how this dish was made, go to this set on flickr.   (It will open in a new tab or window; to return to this page, just close it.) The small pictures are thumbnails; click on each one to see it full-size, and to read the comments under it.  If you prefer to use the slideshow feature, you won't see the captions unless you click on "show info" (top right).

Monday, March 7, 2011

Thai-style Chicken and Coconut Milk

A Thai style soup with ingredients of canned foods, which could be made in a snack corner in a dorm room where there is no refrigeration. We used a slow cooker,  but it could have been done just as easily in a microwave oven or even in a hot pot.

Thai-style chicken and coconut milk soup from cans
Refrigerated ingredients were: 1 lemon, one carrot, and a bit of ginger.  While a fresh lemon is best, lemon juice in packets could be used in a pinch, and the carrot and the ginger could be done without.  Lemon slices can be "harvested" from the cafeteria, probably...

Ingredients:

Cans:
Chicken breast
Chicken broth
Mushrooms
Green beans
Coconut milk

Fresh:
Carrot
Garlic
Ginger (optional)
Cilantro (optional)
Lemon

Flavorings:
2 Tb. Fish Sauce
1 Tb Chinese chili sauce
Parsley flakes
Onion powder

Pour chicken and broth into the cooking vessel.
Drain and add mushrooms.
Drain, chop up, and add green beans.
Chop and add carrots, garlic, and ginger.
Add the flavorings.

Heat to boiling, turn down to a simmer, and cook until the carrot is soft.

Turn off the heat and stir in the can of coconut milk and the lemon juice.
Add Cilantro if you have it.

Chicken and Coconut Milk Soup
A rich, elegant Asian style soup, much nicer than you would expect from a stack of cans!

Serve alone or with rice.

To see a full set of photographs showing how this dish was made, go to this set on flickr.   (It will open in a new tab or window; to return to this page, just close it.) The small pictures are thumbnails; click on each one to see it full-size, and to read the comments under it.  If you prefer to use the slideshow feature, you won't see the captions unless you click on "show info" (top right).

Friday, February 25, 2011

Italian Sausage Cooked in a Hot Pot

Italian sausages weighing 1/4 lb each cooked in a Hot Pot, using a steamer basket to hold the sausages away from the bottom of the pot.


Insert steamer into Hot Pot
Add 2 cups water
Arrange raw Italian sausages in a criss-cross pattern in the steamer
Plug in the pot and set heat control to about halfway (may adjust later as needed)

Cook for at least 20 minutes. Heat will come and go; if it stays off too long, wake it up with a bit more cold water, and/or elevate the heat control.

Sausages will be well cooked but rather grey. That's the down side of hot pot cookery: no way to brown anything.

Remove sausages with tongs. Drain the pot, take out the strainer, add a jar of spaghetti sauce and reduce heat control to low. Return sausages to the pot and allow sauce and sausages to warm together for 15 or more minutes. Serve over pasta.

To see a full set of photographs showing how this dish was made, go to this set on flickr.    (It will open in a new tab or window; to return to this page, just close it.) The small pictures are thumbnails; click on each one to see it full-size, and to read the comments under it.  If you prefer to use the slideshow feature, you won't see the captions unless you click on "show info" (top right).

Gluten-free Penne Boiled in a Hot Pot

Heat 5 cups water to boiling in a hot pot with steamer insert in place. Pour in 2 cups dry penne, stir it around, and leave the cover ajar (not fully open).

Gluten-free Penne boiling in a Hot Pot


With the heat at about 2/3, the boiling comes and goes but the pasta cooks nicely.

Pasta is held off the heating pad by the strainer. There is nothing 
close to as much water as is recommended for cooking pasta; it must be 
gently stirred a few times, and water added as cooking progresses.

When fully cooked, the pasta is tender and very acceptable.

Drain water, add a cup of cold to cool the pot and to stop starch from drying in the bottom, and allow the pasta to drain for a few minutes. Then pour the water out again and invert the contents into a shallow bowl.

Pasta, cooked, is about double the volume of what it was raw.

To see a full set of photographs showing how this dish was made, go to this set on flickr.   (It will open in a new tab or window; to return to this page, just close it.) The small pictures are thumbnails; click on each one to see it full-size, and to read the comments under it.  If you prefer to use the slideshow feature, you won't see the captions unless you click on "show info" (top right).

Thursday, February 24, 2011

Sweet Potatoes Steamed in a Hot Pot

Peel and dice one large or two smaller sweet potatoes.

Place a steamer basket in a Hot Pot, and add a scant 2 cups of water or enough water to fill the space below the steamer.

Arrange sweet potato cubes to fill the basket.


Sweet Potatoes steaming in a Hot Pot with basket insert

Close lid, turn the pot on high, and steam 15 minutes.  Listen to the sounds the pot is making.  Occasionally trickle water into the closed pot through the spout so it doesn't boil dry.  If it is boiling violently, lower the heat setting.  If it stalls, raise the setting.  If it's already on high and stalling, add an ounce of cold water to get it going again.

Open the lid (carefully, the steam is hot!)  and test for doneness.  If you are planning to puree the potatoes, give them more time.  The potatoes in the photographs cooked for 30 minutes.

When the potatoes are done, pour the water out into a container with the lid closed, then turn the whole thing, steamer basket and all, upside down onto a plate, then lift off the steamer.  Season and otherwise prepare the sweet potatoes for serving.


To see a full set of photographs showing how this dish was made, go to this set on flickr.   (It will open in a new tab or window; to return to this page, just close it.) The small pictures are thumbnails; click on each one to see it full-size, and to read the comments under it.  If you prefer to use the slideshow feature, you won't see the captions unless you click on "show info" (top right).

Spinach Steamed in a Hot Pot

A Hot Pot equipped with a steamer basket can do much more than the pot can do by itself.  Fresh spinach comes out tender and green, cleanup is minimal.


Spinach steamed in a Hot Pot inside a steamer basket

Insert a folding steamer basket into the Hot Pot. Add scant 2 cups water.
Stuff in as many spinach leaves as the pot will hold... just pile them up, because they will wilt as soon as they get hot.

Push the lid down and latch it. Turn on the heat to maximum. The pot will boil quickly.

After two minutes steaming, open to rearrange the contents, closed quickly.

Steam 2 more minutes, unplug the pot and allow to rest for 2 minutes.

Total steaming time 4 minutes plus 2 minutes more in the still-warm pot.

Pour off the water, then open and dump it upside down, steamer and all, onto a plate. (Don't try to lift out the steamer, which opens and becomes tippy without the sides of the pot holding it together.) Lift off the steamer and arrange spinach on the plate.  It will be green and beautiful!

Add salt and other seasonings to taste.  Butter is familiar.  Spinach is tasty with a drizzle of olive oil, too.

To see a full set of photographs showing how this dish was made, go to this set on flickr.   (It will open in a new tab or window; to return to this page, just close it.) The small pictures are thumbnails; click on each one to see it full-size, and to read the comments under it.  If you prefer to use the slideshow feature, you won't see the captions unless you click on "show info" (top right).
Monday, February 21, 2011

Boiled Eggs

Eggs in a hot pot
The one thing I know a hot pot can do well: boil eggs.

Put eggs in a single layer in your hot pot.  Cover with water and a little more.  The eggs will float to a standing position, and you can probably fit in another one.  They should be floating loosely.

Heat at maximum until water is boiling, then turn down to medium.  The heat will come and go.  After 8 minutes unplug the pot.

Wait 5 minutes, then pour out the hot water and pour in some cold. Allow it to sit for a bit, cooling, then drain and move the eggs to a dish.

To see a full set of photographs showing boiled eggs, go to this set on flickr.   (It will open in a new tab or window; to return to this page, just close it.) The small pictures are thumbnails; click on each one to see it full-size, and to read the comments under it.  If you prefer to use the slideshow feature, you won't see the captions unless you click on "show info" (top right).